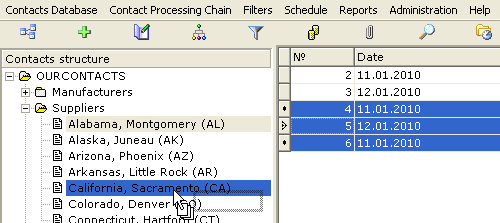
The tree-like structure you can see in the left half of the main window (from now on, we shall call it "the tree" for brevity) serves the purpose of organizing your contacts in a hierarchical structure. You can re-arrange this tree at any time to suit your needs.
To prevent accidental disarrangement of the branches, tree re-arrangement
is disabled until you explicitly turn it on by clicking the ![]() button on the toolbar. After that you can move the
branches around by dragging and dropping them with your mouse. When you have
finished editing your tree, click the button again to protect the changes you
have made.
button on the toolbar. After that you can move the
branches around by dragging and dropping them with your mouse. When you have
finished editing your tree, click the button again to protect the changes you
have made.
To copy contact records from one branch to another, select the records with your mouse, drag them to the destination branch and drop them there.
If you need to copy several records from one branch to another, hold down the Ctrl or Shift key on your keyboard while clicking on the records by the left button of your mouse. When you click on the last record you are selecting, don't release the left mouse button, but drag the cursor onto the tree on the left. The cursor will change its shape to look like a stack of papers. You may find some tree branches in a collapsed state. Such branches have the closed folder icon with plus sign on the left of it. Hover the mouse over the plus sign on the left of the closed folder, then the folder will open, expanding its child branches.
Once the desired branch is found, release the left mouse button, the contact records will be dropped onto the target branch, but the link to the old branch will remain. Thus, the contact records will be linked to both the source and the target branch.
Right-clicking in the main table opens the context menu containing major actions related to editing the records.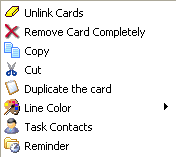
To unlink a contact record from a branch, use the ![]() button
on the table toolbar. First select the record by left-cliking it, then click
the button.
button
on the table toolbar. First select the record by left-cliking it, then click
the button.
To unlink multiple records, select them while holding the Ctrl or Shift key on your keyboard.
IMPORTANT! If a contact record is linked only to one branch, such record cannot be unlinked.To delete a contact record, use the ![]() button
on the toolbar or in the context menu. First select the record by left-cliking
it, then click the button. To delete
multiple records, select them while holding the Ctrl or Shift key
on your keyboard.
button
on the toolbar or in the context menu. First select the record by left-cliking
it, then click the button. To delete
multiple records, select them while holding the Ctrl or Shift key
on your keyboard.
In case you need to create a duplicate of the Contact Business Card,
select the record you want to duplicate by right-clicking on it, then click
on ![]() button.
button.
To move a contact record to a different branch without
saving the link to the old branch, use the ![]() button
on the table toolbar.
button
on the table toolbar.
IMPORTANT! If the contact record is already linked to multiple branches, cutting out this record removes all the record's links which existed before.
First select the record by left-cliking it, then click the button,
then click on the target branch in the tree and click the Paste ![]() button.
To cut and paste multiple records, select them while holding the Ctrl or Shift key
on your keyboard.
button.
To cut and paste multiple records, select them while holding the Ctrl or Shift key
on your keyboard.
Clicking the button opens the Color window, where you may pick the new color for selected record in the table.
To revert the line color to default use the following context menu items: →
The context menu item opens the Task Contacts window.
The context menu item creates a new reminder.
The root of the tree (the very top node) represents the database you are working with as a user, while all the branches below can be managed by users as they wish. Each database may have a unique structure of the tree.
To add a new branch to the tree, navigate to the branch you want to become
a parent of the new branch, right-click on that prospective parent branch and
choose from the context menu or click
on ![]() button on the toolbar. In the opened window, enter the name of the branch and click .
button on the toolbar. In the opened window, enter the name of the branch and click .
If there are already contact records linked to the chosen branch, sub-branches cannot be created in it, the reason for this is protection of data integrity.
To remove a branch, first select it by left-cliking on it, then right-click
on it to open the context menu, choose or
click on ![]() button
on the toolbar. Confirm your intention to delete the branch by clicking on button.
button
on the toolbar. Confirm your intention to delete the branch by clicking on button.
To rename a branch, first select it by left-cliking on it, then right-click
on it to open the context menu, choose or
click on ![]() button
on the toolbar. Confirm your intention to rename the branch by clicking on button.
button
on the toolbar. Confirm your intention to rename the branch by clicking on button.
You cannot rename or delete the root node of the tree, which represents the whole current database and bears its name.
Toolbar buttons ![]() and
and ![]() serve
for expanding and collapsing all the folders (branches) in the tree.
serve
for expanding and collapsing all the folders (branches) in the tree.